Sehingga tahun 2020 ini, sektor pembinaan di negara kita semakin pesat berkembang. Lahirnya kontraktor pembinaan seperti "cendawan tumbuh selepas hujan" memberikan impak positif dalam sektor pembinaan, ditambah pula dengan permintaan masyarakat untuk memiliki rumah sendiri mengikut selera dan kos yang ada.
Untuk memenuhi selera dan kehendak pelanggan, pihak kontraktor itu sendiri perlu memainkan peranan dalam penyediaan servis atau perkhidmatan kepada pelanggan seiring dengan arus pemodenan dan teknologi terkini. Tidak hairanlah mengapa pihak kontraktor perlu bersaing darisegi kebolehan, kepakaran dan ilmu teknikal.
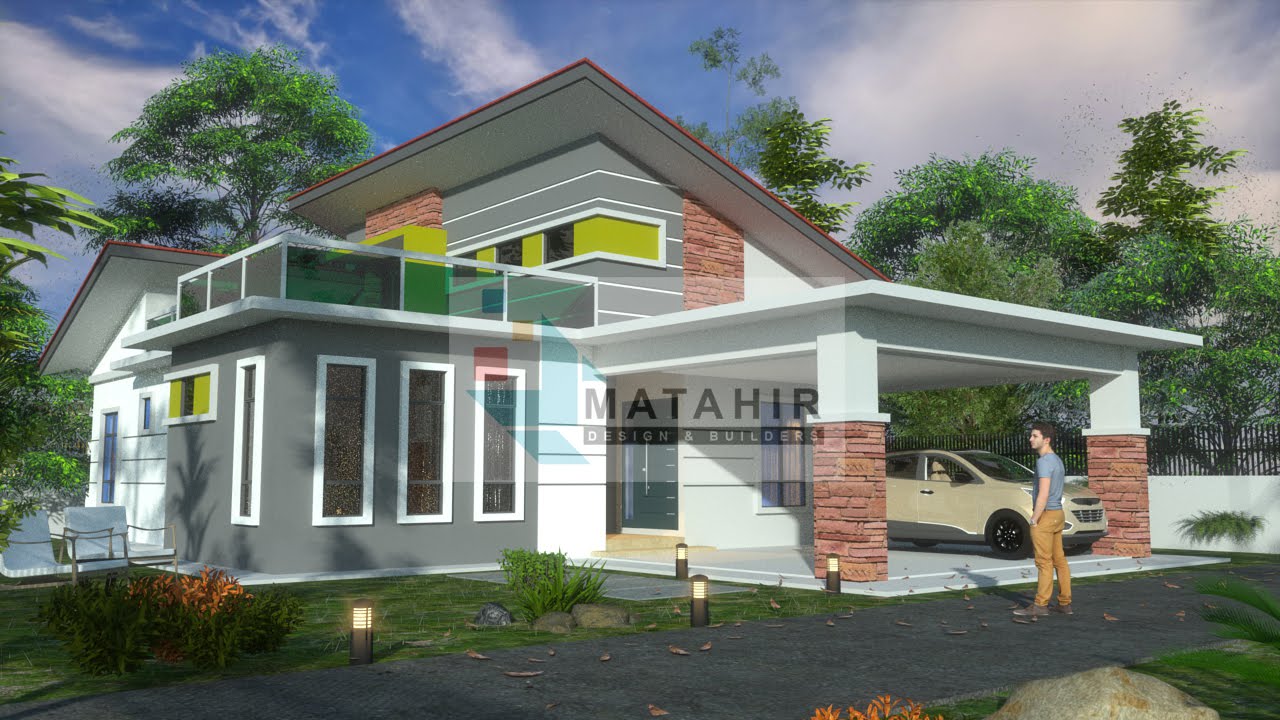
Sejak akhir-akhir ini, ramai pelanggan bina rumah lebih gemar memilih konsep rekabentuk rumah modern dan baru yang beredar di laman web mahupun facebook, mereka lebih mudah faham dan senang untuk mencari rekabentuk yang sesuai dengan kehendak mereka. Selepas proses ini, pelanggan akan mencari beberapa kontraktor untuk mendapatkan pandangan ataupun sebutharga berdasarkan konsep yang dipilih.
Dalam proses ini, pelanggan selalunya akan meminta pihak kontraktor untuk menyediakan pelan rumah dan 3D design mengikut konsep yang mereka sudah muatturun contoh dari mana-mana laman web. Ini merupakan BONUS sekiranya pihak kontraktor dapat menyediakan pelan rumah dan 3D visualiasi kepada pihak pelanggan.
Oleh itu, dalam memberikan khidmat yang terbaik, selaku pihak kontraktor perlu memantapkan kepakaran dari segi teknikal (penyediaan pelan, 3D design) samada dengan melantik perunding pihak ketiga (consultant) ataupun perlu mengambil internal designer dalam syarikat mereka.
Sketchyphysics is a plugin written by C. Phillips for Google's 3-D program Sketchup. It allows the objects you draw in Sketchup to "come to life" in a real world simulation with gravity, collisions and interactions with other objects.
Basic: If you start by making a cube and grouping all the parts into one object, the object will be recognized by SP. Physics will then be applied when you press the RUN button.
There are also auto-shapes provided through a toolbar that is installed with SketchyPhysics. These shapes are already grouped and ready to use, all you have to do is draw them where you want to in your model.
SETTING THE STATE OF THE OBJECT
After making a grouped object, there are 2 main attributes to use when creating an object to use in SP. They are accessed by Right-Clicking a grouped object.
The first option is STATE. This sets how the object behaves in SP.
The STATE options are:
FROZEN: Image will stay in place (it won't fall) until it is hit by another object, then regular Physics takes over.
STATIC: The object will NEVER move, no matter what happens to it. Other objects will bounce off of it.
IGNORE: The object will not move, and other objects will not interact with it. They will pass through it. (It is a ghost.)
On the next page we'll discuss the second option: Shape.
SketchUp to Thea Exporter is an exporter of Google SketchUp models to Thea Render. It is a bridge between those two applications. It will allow you to apply
Thea properties to your SU materials, scenes and components and render the model in Thea. The exported model is being saved in XML file and in an additional
sub-folder containing associated files - textures, meshes and lights.
How to install?
MS Windows Systems:
Please use supplied installer. It is advised to install Thea Render first and enter the exporter serial number in Thea.
Please make sure you have administrator rights while installing the plugin.
A default SketchUp installation folder is:
C:\Program Files\Google\Google Sketchup (>version number<) \Plugins
The folder will be automatically found in case of SketchUP versions 6, 7 and 8.
MAC OSX Systems:
Please use supplied ZIP archive. OSX installer will be available soon.
It is advised to install Thea Render first and license SketchUp exporter inside Thea.
A default TheaExporter installation folder is:
Macintosh HD/Library/Application Support/Google Sketchup >version number</Sketchup/Plugins
1.Please unpack\copy all files and folders into a Sketchup\Plugings folder
>> Sketchup\Plugins\TheaExporter.rbs
>> Sketchup\Plugins\TheaExporter_files\
Overwrite all older files.
Trial version limitations
The plugin offers unlimited evaluation period. In case you have a full version of Thea without SU-2-Thea plugin license some of exported faces will be painted with a
default material. Use of the trial version for commercial purposes is prohibited.
SketchUp adalah pakej modeling 3D yang berkaitan dengan pendekatan lakaran asas modeling. SketchUp direka khas untuk beroperasi pada sistem dengan kad grafik. Kebiasaanya, terdapat tiga jenis Kad Grafik di SketchUp yang mudah untuk didapati dipasaran - ATI, NVIDIA, Intel.
AKAN DATANG! CADANGAN JENIS KAD GRAFIK YANG SESUAI BESERTA DENGAN HARGA YANG BOLEH DIDAPATI DIPASARAN [serendah RM110 dan ke atas]
Sila dapatkan secara PERCUMA, majalah "SketchUp ur SPACE" Edisi Mac 2011 untuk mendapatkan sedikit info tambahan dan panduan darisegi modeling, rendering, animation, plugin terbaru dan banyak lagi. Di antara kandungan majalah ini termasuklah:
SketchUp Animation: A Dynamic Way to View the Model
Artikel: Create a spiral staricase, strategic approach of SketchUp, London 3D project
Blog: SketchUp in the making of Avatar
Bahasa: English / German
Struktur Tensile adalah suatu rekabentuk yang menarik, moden dan canggih yang mampu menjadikan idea rekabentuk anda lebih menarik dan serbaguna. Setiap individu yang ingin melakarkan idea asal tetapi tersekat dan berhadapan dengan masalah darisegi visual struktur.
Plugin Soap Skin & Bubble adalah alatan untuk membantu pereka dalam mengkaji mekanikal dan struktur regangan permukaan Tensile pada peringkat awal proses rekabentuk.
Antara fungsi dan juga kegunaan plugin ini dalam proses merekabentuk: Proses mencari bentuk: alatan untuk menghasilkan bentuk 3D - modifikasi visual jaring/tensile (gerak, pusing) - ridge dan vally cable - anchoring cables - manipulasi karakter jaring Proses menganalisis membran - kekuatan membran - kekuatan kabel Proses menganalisis struktur sokongan
Semua fungsi alatan plugins Soap Skin & Bubble ini hanya berfungsi untuk tujuan draft arkitek atau pereka sahaja dalam menganggarkan struktur dan kos kasar pembinaan.
Contoh penghasilan struktur tensile menggunakan plugin ini:
Hyper Paraboloid
Saddle-surface
Ridge-Valley-Surface
Pneumatic-surface
AKAN DATANG! Tutorial penggunaan plugin Soap Skin & Bubble dalamBahasa Melayu
People who design for Film and Television use SketchUp Pro because it lets them work as fast as they can think. From storyboards to set designs, SketchUp Pro is a simple but powerful tool for exploring and presenting your ideas in 3D.
Meet tight deadlines (Is there any other kind?)
SketchUp isn't just quick to learn - it's quick to use, too. Once you get rolling, SketchUp can help you work out your ideas, solve complicated spacial problems, and produce convincing visuals faster than any other digital drawing tool out there.
Work with realistic cameras and see your shots before the shoot
The free Film and Stage plugin for SketchUp lets you view your model through realistically-configured cameras. You can choose a lens/aspect ratio combination, make focal length and position adjustments, and "look through" your camera to preview your shots. You can even perform tilt, dolly, truck and pedestal moves to simulate the action of a real camera. Once your cameras are set up, it's easy to find the precise height, tilt angle and focal length for each one.
Create storyboards in LayOut
SketchUp Pro includes LayOut, a brand-new tool for creating 2D presentations from your SketchUp models. Of course, you can use LayOut to draw storyboards, but you can also use it to add titles, callouts, graphics and other information to your model views. LayOut lets you print multi-page documents on any size paper, export to PDF, and even go full-screen for digital presentations.
Send your work to other programs
The Pro version of SketchUp allows you to export your model data into several different formats so you can use it throughout your software workflow. With the exporters that are built into SketchUp Pro, you can send 2D views and 3D models to programs like Vectorworks for further design development.
Build models from photos
Need to model a specific location? You can use SketchUp's new photo matching feature to build models based on photographs.
IN BAHASA:
Apakah alatan canggih yang digunakan oleh pereka untuk mencipta robot jahat dalam movie Avatar? Bagaimanakah pula tentang peralatan produksi yang dipraktikkan dalam pembikinan filem 300 and Good Night? Menghasilkan rekaan set dalam filem The Social Network? Persekitaran yang berunsurkan futuristik digambarkan dalam filem Tron: Legacy? Hanya menggunakan SketchUp!
Advanced Camera Tools
Disini kami cuba kongsikan panduan dan tips menggunakan Advanced Camera Tools dimana ianya mebolehkan kita bekerja menggunakan kamera yang nyata dengan pandangan ataupun persekitaran yang lebih realistik. Dengan menggunakan plugins ini, ianya memberikan kawalan kamera yang lebih tepat berbanding alatan kamera yang sediada seperti Focal Length, Aspect Ratio dan Image Width dimana memudahkan kita melihat secara tepat pratonton kamera sebenar walau hanya di dalam SketchUp.
Video ini menunjukan secara ringkas penggunaan plugins Advanced Camera Tools:
Contoh yang kita boleh hasilkan menggunakan plugin Advanced Camera Tools:
Letakkan sahaja kamera di dalam model dan cuba halakan pandangan untuk mendapatkan gambaran pratonton yang nyata.
Pilih daripada jenis kamera yang disediakan atau hasilkan sendiri.
Kedudukan dan sudut pandangan menggunakan kamera bergerak seperti Pan, Tilt, Roll, Dolly, Truck dan Pedestal.
Menetapkan Focal Length dari setiap kamera untuk mensimulasikan fizikal lensa..
AKAN DATANG! Tutorial penggunaan pluginsAdvanced Camera Tools dalamBahasa Melayu
Plugin ini sebenarnya PERCUMA, sila dapatkan di sini!


